Pages

Wednesday, September 26, 2012

Tuscan Leaf

 I am posting a last minute late night post to join in on the Color Me Beautiful Challenge this week. I needed to make a CAS card that was pretty quick to make and this card fit the bill.
I embossed the leaf from Gently Falling in clear then added More Mustard, Cajun Craze, and Perfect Plum. I then embossed the outline in gold as well as the sentiment. As a finishing tough to the image I sprinkled a few water droplets over the ink and then dried with my heat gun. I liked how this little detail finished this soft and simple card.

The Winner!!

Hi! I decided to make a card for my Sister-in-law who is running a Half Marathon this Saturday. I was suppose to be running with her, but that is just not going to happen! I wanted to send her a card of encouragement and thought this would be the perfect card! I used the Fab Friday #2 Color Challenge and the Paper Pal Arts#143 sketch challenge.
 
I love using circle on cards! I thought this would be a fun addition to the Blue Ribbon stamp set. Thanks for stopping!


Tuesday, September 25, 2012

Thinking of you...

Today I am showing you a card that I have created for the Dynamic Duos #21 Challenge and the Retrosketches Challenge #30. I have not used Always Artichoke  and Certainly Celery together in a long time and thought it would be a great challenge for me. I LOVED the simplicity of the sketch for Retrosketches and had so many ideas going through my head, but this is what came together:

I used the Elegant Bouquet Impressions Folder and used the brayer to apply Always Artichoke Ink. I used a sponge dauber on the EF to remove some ink to soften the color around the edge of the raised image. I added Dazzling Details to make the center of the flowers sparkle a bit. The Papillon Butterfly was inked in the Celery then Artichoke was added to the edges with a Stampin' Write Marker. The coordinating punch makes cutting easy!
This was a quick fun little card to make!
Thanks for looking!
Aimee


Sunday, September 23, 2012

Crayon Rubbed Embossing

Hello! I had a wonderful weekend but not too much crafting going on. I did take some time this evening to finish a card I was making for 3 challenges. The sketch is from Create with Connie and Mary #219; colors are from colourQ #155; and the technique is from Hand Stamped Sentiments. By combining these challenge I created a card that has a vintage feel. Here is my card..
 

 I used the Finial Press Impressions Folder with the Crayon Rubbed Embossing. I then used my sponge daubers and added So Safron, Wisteria Wonder (I had no Pale Plum), then Rich Razzleberry...in that order. I also made my own shimmer Mist with Rubbing Alcohol, Shimmer Paint, and reinkers. I used this to color the Paper Flowers. I also used the Color Spritzer on the petals as well. I really LOVED this technique! It was so simple to do and we will be using this at our next Stamp Camp!
Thanks for stopping!! :)


White Wedding

This week the CASology challenge's cue word is "WHITE." I love to start with white on my cards then add color. For this challenge I thought I would try to just use white with maybe a small splash of silver. Here is my card...
 

Whenever I think of all white, I think of a wedding. I used the Polka Dot Impressions Folder to add texture to the background tohelp break up the layers of white. By adding a little silver Glimmer Paper it gave this card a classy wedding look. The size of this card is 4 1/4 x 4 1/4 so it will still fit in a standard envelope. I had fun adding the little details and could have kept going but I thought I should probably stop here. This was a quick, fun, little card to make.
Have a great day! :)
Aimee


Saturday, September 22, 2012

First Day of Fall

I am posting a little later tonight, but I am so excited to share the card I have made for the Mojo Monday #259 Challenge and the Friday Mashup Challenge #77. I have been joining in on several CAS challenges and this challenge is more layers and more details. I have been thinking about this for several days and was happy when the card looked like what I had imagined! :) Here are the challenge guidlelines:
The Friday Mashup we are to 1. Create and Indian Summer Project or 2. Create a project using 3 of the following: Cajun Craze, Early Espresso, Lucky Limeade, Raspberry Ripple, or More Mustard. or 3. Mash it up and Do both!
Here is my card...
 
I tried to use some things I had not used in a while or ever. I decided to use River Rock, Cajun Craze, Lucky Limeade (because I am addicted!), and Early Espresso. I NEVER use River Rock and I thought it would make a great base for this card. I used the En Francis background stamp and inked it with River Rock. I then used Early Espresso and used the Rock and Roll method but basically in selective areas of the background stamp. I then used sponge doubers to darken the edges to make the details of the card stand out a bit more.
The part of he card I was most excited about was how the Paper Doily turned out. It was a little bigger than I wanted so I trimmed off the outer layer. This was much easier to do than what I thought it was going to be. When I layer it with the First Edition DSP it need a bit more color. So I tried something that I had never tried before. I used the negative pieces from a Paper Doily cut with Lucky Limeade and Cajun Craze to add some color detail to the doily. I know it sounds tedious and time consuming, but it really wasn't! It was similar to the "fussy cutting." I just needed a little patience. To me, it was well worth the effort. Here is a closer look...
Thanks so much for stopping by and taking a look! Have a great weekend!! :)
Aimee
 

Wednesday, September 19, 2012

Brooke's Ice Cream Card

My daughter Brooke is 8 years old and shares my love of crafting. We love to spend time together coming up with lots of creations. When I was scanning the current challenges I was so excited about 2 that I came across. The first is at SUO Challenges. For this challenge we are to create a card or 3D item with kids in mind. SOOO, I had Brooke pick out her favorite stamp set and colors and help me come up with our latest creation. When I saw the sketch for Freshly Made Sketches I knew this would work PERFECTLY.
 

Brooke's favorite colors are Tempting Turquoise and Lucky Limeade. She loves to use the Mouthwatering stamp set and emboss with all the different scents. For this card I used the Vanilla scented embossing powder and her question was,"Why did you use vanilla when the ice cream is Blueberry flavored?" I told her because we could do anything we wanted to! :) She like that answer!
For the focal image I layered several times.First I used the Apothecary Framelits and sponged the Tempting Turquoise around the edge to make it pop a bit more. Then I used the large scallop circle and punch out a piece of Glossy white card stock that I sponged Frost White Shimmer paint on then sponged on Tempting Turquoise and Lucky Limeade. it gives it an iridescent appearance. The ice cream cone I attached with dimensionals. I had fun placing the strips of paper "randomly." I thought this gave a whimsical feels to the card. I added the Cherry Cobbler heart to help the red cherry blend in.
When we were done Brooke said,"Mom...this is more like a teenager card!" I think that meant she really liked it! Thanks for the great challenges! I had lots of fun!!
Aimee

Black Tie Friday

I found a new challenge to enter! It is called Black Tie Friday and this is the very first challenge.I decided to remake a card I had made before but put a different spin on it. I have never entered this card in a challenge so I was happy that I could make it fit here. Here is my card...

This background was made with using reinkers and an AquaPainter. It is a very simple technique and more details can be found on the blog post, Watercolor Butterflies. I made up several of these backgrounds at once so it is very easy to assemble when I need a quick card. The butterfly is made with vellum and I embossed in black the scroll type stamp from Elegant Eleanor. I then colored the back trying to match the color scheme already on the card. I wanted it to look like the butterfly had chameleon qualities. I then painted over the butterfly with Frost White Shimmer Paint. I used the ribbon to make the body and antenna's for the butterfly.
Thanks for stopping by!
Aimee
 

Tuesday, September 18, 2012

Friday Mashup

I decided to join in on the Friday Mashup challenge this week. I have seen the "Starburst Technique" but have never tried it myself so I thought I would give it a go!

I used the Comfort Cafe DSP and loved the vintage look that this card started with. After adding the layered framelits and ribbon this card was complete. I loved the starburst technique! I am sure I will be trying this again very soon!
Aimee :)
 

Simple Pumpkin

I wanted to make a card for this week's Less is More Challenge. We needed to incorporate an OVAL somewhere on our creation. I have a hard time with the "less is More" concept because I always want to add MORE! This has been a great challenge for me to learn to STOP when adding to my creations. Here is my card...
I made the pumpkin from punching 3 ovals with the large oval punch. I embossed the ovals with the Woodgrain Impressions Folder then sponged Pumpkin Pie ink on the edges to add dimension. I also attached the front oval with Dimensionals to give a 3D effect. The leaf is from the Little Leaves Sizzlit I cut out. I then used the negative piece as a stencil and sponged leaves on the bottom with More Mustard, Pumpkin Pie, and Almost Artichoke...in that order. The sentiment is from a retired Hostess set that I embossed with Early Espresso. I, of course, added some color with the Color Spritzer tool and some Almost Artichoke Seam Binding. OH, I almost forgot! The curly twine was something I have had in my drawer for years. I wrapped it around my paper piercing too then spritzed with water and let dry. I attached it to the pumpkin with Tom Bow. Then I told myself...STOP!!
I hope you enjoy my creation and have a great day!!
Aimee :)

Monday, September 17, 2012

Wonderful Flowers

When I saw the beautiful colors from the Color Me Beautiful challenge this week, I was so excited to join in! Lucky Limeade is my favorite green right now. It seems to go with ANYTHING that I am creating. :)
 
I started by using the Floral Frames Framelits and cutting out the large floral shape from the Whisper White Card stock. I then stamped the images using Betsy's Blossoms and masking the leaves to appear layered. For the center of the large flower, I used the new small scalloped circle as the center as well as the 3/4" circle punch. The other flowers were built using the Boho Blossoms punch. I made the small leaves from cutting a petal from the medium Boho Blossom flower. I used Dimensionals to attach the Whisper White card stock to the Rich Razzleberry DSP to allow a bit more dimension to the card. The sentiment is from Friendly Phrases. I colored with Basic Gray Stampin'Write marker and Rich Razzleberry and Tempting Turquoise reinker and blender pen. The final touch was adding some rhinestones for some bling.
Thanks for stopping by!
Aimee


Sunday, September 16, 2012

Little Ghouls

This was the first time I have been able to use the new stamp set Googly Ghouls. I thought I would put it to use and combine a couple great challenges, Dynamic Duos#20 and Retro Sketches #29. Here is the card I came up with...


I knew right away when I say this sketch that I wanted to try to make some of the little ghouls look like they were peeking through some windows...like they were waiting to jump out and scare you! :) The last little mummy I wanted him to look like he jumped out to say "BOOOO!" I first cut out the piece of Lucky Limeade CS. I then punched out 3 large black squares with the square punch. I attached them where I wanted. I then punched out a Post-it note with the Postage stamp punch and placed it over the black square. This was a great help to guide me to where to punch out the window. I then placed the pieced with the 3 punched windows in place. I placed the Post-it notes back in place then removed the punched piece. This helped me to know exactly where to stamp the Ghouls on the underneath white piece. After coloring with Blender Pens and Ink, I attached the 3 window panel with dimensionals. I stamped the Mummy on another white piece and colored with Blender Pens and Sahara Sand to make him look aged. I fussy cut him out and used 3 dimensionals behind his head to make him appear as though he was jumping out of the card. Of COURSE....I had to add some of the Googlie Eyes! What a fun little touch!
This was such a fun little card to create and I can't wait to send this to an unassuming niece or nephew of mine!
Thanks for stopping and have a great day!!
Aimee


Friday, September 14, 2012

Sunny Sunflower

I made this thank you card for my mom to give to her boss. He loves sunflowers and is encouraging a contest at work between employees to grow Sunflowers from seeds. Mom wanted to give him a special "thank-you" and I thought this would be a great card for him...

I used the Blossom Petals Punch to make the petals and curled them a bit with my bone folder. I also used the Square Lattice Impressions folder to give a little texture to the center of the flower. I put the flower together before adhering it to the front of the card. Once it was together I sprayed it heavily with a shimmer mist that I made by adding Shimmer Paint to rubbing alcohol. It is a little hard to see in the picture but it does "shine."
 
 The sentiment is from the stamp set Perfectly Penned. I added some Early Espresso Ink with the Color Spritzer tool...one of my favorite finishing touches!
Have a great FRIDAY!
Aimee
 

Thursday, September 13, 2012

Just for fun!

I have been doing a lot of stamping lately! I wanted to show you a card that was very fun and simple to do! I used the colors together on a colourQ challenge this week and LOVED them so much I decided to use them again.
For this card I inked up my clear blocks...Yep the BLOCKS! I randomly stamped the blocks with Pool Party, Calypso Coral, and So Saffron. I used Chocolate Chip ink to stamp the image from Summer Silhouettes and the sentiment from Petite Pairs. I then used the oval punch and added the sentiment with dimensionals. Of course Pool Party Seam Binding and some color from the Color Spritzer tool added the finishing touches.
This card took me less than 10 minutes to design and finish! I have to say it is a bit different than what I usually do but I was very happy with the end result. :)
What do you think?
Thanks for stopping by!!
Aimee

Wednesday, September 12, 2012

Floral Fusion

This week for the Color Me Beautiful Challenge#2, Red was Blossoming! I have been trying to catch up on making some sympathy cards and I thought this would be a great chance to use this color combination.

 I decided to use one of my favorite flowers which is from the Sizzlit, Floral Fusion. I used sponge daubers to add the corresponding colors to the card stock i used for the flowers. This gives the petals a little more dimension. I also added the Little Leaves Sizzlit which meant very little stamping was needed. I also used the Square Lattice Impressions folder for the leaves to add a bit more texture. By adding some Basic Pearls the flowers were complete. I also used the Simply Scored to add a border around the outside of the card. The sentiment is from Teeny Tiny Wishes. This is such a simple card to showcase the Big Shot and some of the less expensive die cutting options.
Thanks for stopping by!!
Aimee


Falling Leaves...

Fall is my most FAVORITE time of year! It never lasts long enough! There is something about wearing jeans and a sweatshirt that feels so good to me! I decided to join in on the Dynamic Duos #19 Challenge and the Less is More Challenge this week. The Less is More challenge is the one layer card with the focus being on LEAVES...
This was such a fun but simple card to make. I first used the background stamp EnFrancis with Crumb Cake ink. Then I used the Gently Falling stamp set and embossed the solid leaves in clear. I then use the sponge daubers and added the Cajun Craze and Always Artichoke around the embossed images. Then I used the outline of the leaves and embossed in gold. It is so hard for me not to add some ribbon to a card so I thought this would be a simple little touch. I stamped the sentiment on the inside. What I love about this card is the simplicity and the fact that it can be used for many occasions.
Have a great day!!
Aimee


Sunday, September 9, 2012

Wedding Album Card

A good friend and coworker of mine, Lori, is getting married next weekend, and I was in charge of making a card for her. I needed to make a card large enough for several people to sign. As I started to think about the design I decided to make her more of a "keepsake" card. Once of my favorite 3D items to make is a mini photo album. Since I have a love for photography, I love to give people pictures too! I decided to make her a "card" that would also have places to put pictures from her wedding. I will be taking the pictures at the wedding to be added to the "card" later.
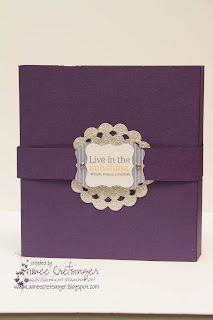
Here is the front...
Front with band on
Front with band off
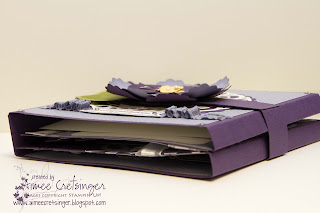
This album measures 5 1/2 x 6 x 1inch when closed. I used a "slip off" band to keep the album closed. I wanted to add layering so when the band is removed the card still looks complete. Lori's favorite color is purple, so Elegant Eggplant and Wisteria Wonder were my colors of choice. I added some So Saffron flowers for a little contrast. Since this is for a wedding card, I also added some glimmer paper whenever I could without making it too "elegant."
Side view of album closed

This is a how it appears as it opens. On the right is where a picture can be placed.

When the album is fully opened you will see four panels. These are the two panels on the left side. On the flip pages is where we will sign. Later this can easily be adapted to place more photographs.
 
This is the right two panels when the album is fully opened where more photos will be added.
 
The back with band removed
The back with the slip band on.
 
I had so much fun making this for my friend, Lori! This is such a great way to personalize a card as well as make it a gift they can display in their home. The best part is we give it to her tomorrow! SO...I don't have to keep a secret very long!!
Have a great day! :)
Aimee